EASE: Minimal DIY expertise required
The Top Plate Castor (Also known as the “Flat Plate Castor”) is one of the most common types of Castor Wheel, providing a simple, yet straight forward installation method. They are generally installed onto flat structures, for example wooden board.
There are, however, a number of guidelines which should be followed, when considering Castor Wheel Installation, in order provide 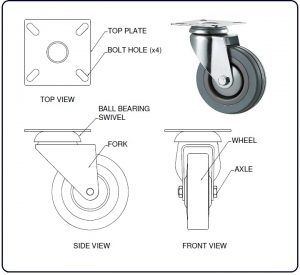 ensure long life & trouble free operation.
Before we discuss the installation considerations, the following criteria should be considered to ensure the correct castor wheel has been selected:
Prepare the Surface and Structure – It is important that the structure in which the Castors are to be mounted are sufficiently rigid to support the load. For example, if you are mounting the Castors to a previously non-mobile item (for example a table) it should be considered that the Castors will concentrate the load over the surface area of the Top Plates, as opposed to the full surface area of the structure (i.e. wooden base). It may therefore be necessary to “build-up” the corners with extra wood, to increase the strength.
For Large Equipment, or relatively week wood, castors in the centre or outside edges should be considered to provide additional support to stop the wooden structure from flexing.
Marking Out – Place the Top Plate onto the wooden board, and position into the desired place (making sure not to position to close to the edge of the wood). Now, using a Pencil, mark each of the 4 hole positions onto the wood.
Repeat above step for each Castor Wheel Position
IMPORTANT: The alignment of the Castors is extremely important. Castors should generally be positioned symmetrically +/-1mm, unless other positioning has been designed, however alignment is extremely important to ensure stress is not applied to the Castor Fork, which during a “turn” could cause the Castor Fork to buckle.
Pilot Holes – Once the “Bolt Holes” have been market out and the alignment and positioning has been checked, the next stage is the drill pilot holes. Using a drill piece which is approx.. 50% the diameter of the bolt, a pilot hole should be drilled for each bolt hole position.
Install the Castors – The Castors can now be placed into position and screwed into the equipment. The strength of the screw/bolt is important, and we advise using grade 8.8 for optimum performance.
Check the Manoeuvrability – Now that the Castors have been installed, you should test the equipment to ensure that the wheels all function as required. Particular attention should be paid to any wheel that is not making full contact with the flooring surface, in which case packing shims should be used to correct the height.
For further reading, check out Wikipedia page https://en.wikipedia.org/wiki/Caster
Disclaimer: Information is provided for guidance only. The installer should ensure they have sufficient experience and knowledge to take on any project. Installers should contact Bulldog Castors Ltd for guidance on their exact application, as Castor Wheel installation considerations & practices may vary from those stated in this article.
Copyright Bulldog Castors Ltd 2017
